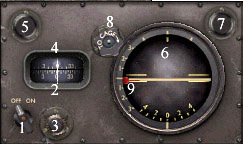
1. On/off 2. Heading indicator
3. Heading indicator knob 4. Heading Reference
5. Heading Reference knob 6. Attitude Indicator
7. Attitude Indicator knob 8. Cage knob
9. Pitch Reference bug
Lockheed Model 5B and 5C Vega Flight Notes
Many factors affect flight planning and aircraft operation, including aircraft weight, weather, and runway surface. The recommended flight parameters listed below are intended to give approximations for flights at maximum takeoff or landing weight on a day with International Standard Atmosphere (ISA) conditions.
|
Important: These instructions are intended for use with Flight Simulator only and are no substitute for using the actual aircraft manual for real-world flight. Note: As with all of the Flight Simulator aircraft, the V-speeds and checklists are located on the Kneeboard. To access the Kneeboard while flying, press F10, or select the Aircraft menu, and then choose Kneeboard. Note: All speeds given in Flight Notes are indicated airspeeds. If you're using these speeds as reference, be sure that you select "Display Indicated Airspeed" in the Realism Settings dialog box. Speeds listed in the specifications table are shown as true airspeeds. |
|
By default, this aircraft has full fuel and payload. Depending on atmospheric conditions, altitude, and other factors, you will not get the same performance at gross weight that you would with a lighter load. |
Required Runway Length
2,500 feet (765 meters), with ISA conditions. Wiley Post was able to get the Winnie Mae off in 1,900 feet (579 meters) at gross weight on a grass field, but he was an expert. Do you think you can match that performance at full realism? Give it a try.
|
Note: The length required for both takeoff and landing is a result of a number of factors, including aircraft weight, altitude, headwind, use of flaps, and ambient temperature. Lower weights and temperatures will result in better performance, as will having a headwind component. Higher altitudes and temperatures will degrade performance. |
Engine Startup
The engine will be running automatically every time you begin a flight. If you shut the engine down, you can initiate an auto-startup sequence by pressing CTRL+E. If you want to do the startup procedures manually, use the checklist on the Kneeboard.
Taxiing
Set prop and mixture full forward for taxiing. As you move down the taxiway, use the rudder to turn the nose right and left for directional control. (Twist the joystick; use the rudder pedals; or press 0 and ENTER on the numeric keyboard to turn left or right, respectively.) The Vega is a taildragger and visibility over the nose is very limited. Use "S" turns as you taxi to look ahead through the side windows.
Flaps
The Vega doesn't have flaps.
Takeoff
Run through the Before Takeoff checklist found on the Kneeboard (F10). Align the aircraft with the white runway centerline, and advance the throttle to full power. Apply some forward pressure on the stick until the tail comes up at around 58-60 mph. Rotate at 75-80 mph. After you safely clear any obstacles, throttle the engine back below 2,200 rpm. Don't run the Vega's engine above this engine setting for more than a few minutes.
Climb
Climb speed for the Vega is between 110 and 120 mph, but will decrease with altitude. Set the power to about 30 inches of manifold pressure and 2,100 rpm propeller speed.
Cruise
Cruise altitude would normally be determined by winds, weather, and other factors. You might want to use these factors in your flight planning if you have created weather systems along your route. Optimum altitude is the altitude that gives the best fuel economy for a given configuration and gross weight. A complete discussion about choosing altitudes is beyond the scope of this section.
Cruise speed in the Vega is 140-150 mph. A good power setting is 25 inches of manifold pressure and 2,000 rpm (CTRL+Shift+F2 or CTRL+Shift+F3 to adjust manifold pressure and CTRL+F2 or CTRL+F3 to adjust propeller RPM).
If you're manually managing the fuel on long flights, burn from the fuselage tanks first and then the wing tanks. Once you switch from the default fuel feed and feed from individual tanks, you can't switch back to drawing from all tanks. If you allow the Vega to become tail heavy with unburned fuel, the airplane will become more unstable and may be difficult to handle.
Descent
A good descent profile includes knowing where to start down from cruise altitude and planning ahead for the approach. Normal descent is done with no less than 20" of manifold pressure and 2,050 rpm. A good rule for determining when to start your descent is the 3-to-1 rule (three miles distance per thousand feet in altitude). Take your altitude in feet, drop the last three zeros, and multiply by 3.
For example, to descend from a cruise altitude of 10,000 feet (3,048 meters)
to sea level:
10,000 minus the last three zeros is 10.
10x3=30
This means you should begin your descent 30 nautical miles from your destination, maintaining a speed of 135 knots (155 mph;it may not indicate this high until you descend into denser air) and a descent rate of 500 ft per minute. Add two extra miles for every 10 knots of tailwind.
In the Vega, adjust power during descent to maintain 140 mph (use the joystick throttle or press F2 to decrease thrust or F3 to increase thrust). The propeller lever should remain at 2,050 rpm.
Approach
Reduce airspeed to 85-95 mph for the approach phase of flight.
Landing
On final approach, plan for a landing speed of 80-85 mph. You'll need a little power to maintain this speed. A three-point landing or a wheel landing will work in the Vega, but a wheel landing is preferable due to poor visibility in the three-point attitude. Once the tail is on the ground, bring the power back to idle and lightly apply the brakes by pressing the PERIOD key.
CAUTION: On rough landing fields or with heavy braking techniques, there is a danger of nosing over in the Vega. Use a light touch on the brakes by tapping them instead of holding down the brake key.
Using the Vega's Autopilot
This section discusses autopilot features specific to the Vega. (For a general discussion of autopilots, see Using an Autopilot.) The autopilot settings in Flight Simulator are not persistent or saved, so if a flight is reloaded, the pitch and heading will return to 0 degrees.
The autopilot has two gauges and an on/off switch. If the master switch is off, the power for the autopilot is not available.
1. On/off 2. Heading indicator
3. Heading indicator knob 4. Heading Reference
5. Heading Reference knob 6. Attitude Indicator
7. Attitude Indicator knob 8. Cage knob
9. Pitch Reference bug
On the left side of the autopilot is a wheel-style directional gyro with an adjustment knob below it. Immediately above the directional gyro wheel is another knob, the Autopilot Heading Reference. Rotate the Heading Reference knob on the upper left of the directional gyro to set a desired heading (clockwise to turn right, counterclockwise to turn left). When the autopilot is on, the aircraft will turn to and follow the course set by the user on the Autopilot Heading Reference. The default setting for the Autopilot Heading Reference is zero degrees.
On the right side of the autopilot is a standard attitude indicator with an adjustment knob and a cage knob. The instrument face also has an Autopilot Pitch Reference in the shape of a slender red needle. Rotate the Pitch Reference knob on the upper right of the autopilot to set the desired pitch angle. When the autopilot is engaged the aircraft will hold the pitch angle set by the pilot. The default setting for the Autopilot Pitch Reference is zero degrees.
The autopilot essentially holds a given attitude, not an altitude. If the aircraft is disrupted by turbulence, the autopilot will attempt to return the aircraft to the selected attitude and heading. If gyro drift is turned on in the Realism dialog box, the autopilot will drift off course as the directional gyro drifts.
If you use the keyboard command for altitude hold (CTRL+Z) the autopilot will behave like a more modern unit, holding altitude (at a constant power setting) even though the unit is designed to hold attitude. You will not be able to override the autopilot control of the aircraft by manipulating the stick and rudder. You must turn off the autopilot to regain control of the aircraft.